

A chord box, also known as a chord diagram or a chord chart is a simple line picture of the guitar fretboard which shows us which frets we need to put our fingers on and which strings we need to strum in order to play a chord.
You’ll see guitar chords written down like this on the internet and in books when you’re looking for songs to strum or just working your way through learning a list of chords in your practise. it’s a simple very accessible way to write down and read guitar chords without having to know music notation.
What the lines mean
The basic template shows us:
- 6 vertical lines: These are the 6 strings on the guitar. The one on the furthest left is the thick E (6) string.
- Horizontal lines: These indicate the fret wires. The thick line at the top (if there is one) represents the nut at the end of the fretboard. This helps us to see that the first space is fret number 1.


We add X and O onto the top of the diagram to tell us which strings to strum / pick with our other hand (strumming hand).
- X = do not play
- O = strum the string but there are no fingers pressing the frets down eg play the open string
In the A chord below we now know… do not play the E (6) string, strum 5 strings in total but only press fingers down on 3 frets.

Other things you will see are:
- A line joining a few frets together – this indicates a barre (it can be 2, 3, 4,, 5 or 6 strings). In the F chord below it instructs us to put our index finger across the e (1) and B (2) strings at the same time and press them down with that one finger. In the Bm chord we lay (barre) our index finger across 5 strings (A, D, G, B and e) while the remaining 3 fingers play the other frets shown. In fact, although we lay our index finger across 5 strings it only actually needs to press down the A (5) and the e (1) strings as the ones inbetween are taken care of by the other fingers.


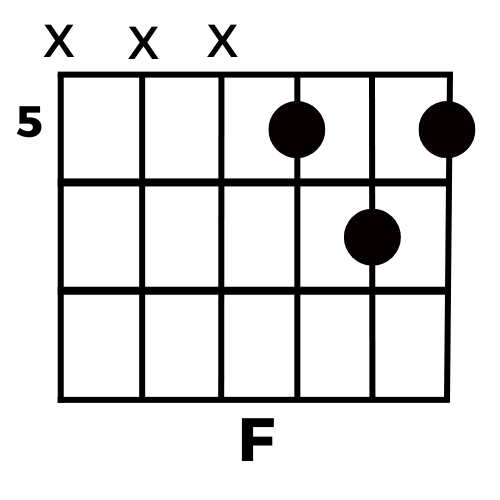
- Fret Numbers – as we go further up the guitar fretboard we have to number the frets in order to give us our bearings. The F chord below has 2 fingers on fret 5 and one finger on fret 6. This is indicated by a small number 5 to the left of the fret. This sometimes has 5fr = fret 5.
Now you have mastered reading chord boxes it’s time to go and learn some more chords. The more practise you get, the easier it will become.
Here is a link to a FREE BLANK CHORD BOX PDF. You can print this off and write your own. Here is a link to THE MOST COMMON 8 guitar chords. Start here.
See you next time!
0 Comments