

Do you have guitar frustrations!? Niggles, buzzes and slow chord changes that are sticking around and affecting your guitar progress much longer than you want?
Well, anyone who plays (new & old) does. These things are a rite of passage to becoming a great player…. get comfy.
There may be really simple fixes that can send your playing flying to a whole different level. We often get stuck repeating mistakes we can’t see a way out of or just don’t have what is often a fraction of knowledge that would solve our problem.
Here are 15 Mistakes beginner guitarists make and their fixes…
1. Too much pick – Look at how much pick you have sticking out of your fingers when you strum. I see a lot of beginner players with loads of pick sticking out and this causes them to fumble, catch and miss the strings they’re aiming to pick or strum. Hold the pick with your thumb and index finger. At a right angle to your arm so you can get nice and close to the strings if you need to and pull back if you need to. As for the amount of pick sticking out? This varies depending on what you’re playing and the effect you’re trying to get. Expert tip – you will find that a pro guitarist differs how they hold their pick depending on the feel, style and genre they’re playing.
-

- a lot of pick
-

- good position \ short pick (controlled)
-

- good hold (v. short)
2. The Sideways Thumb – Dropping the thumb down to the side behind the neck. Keep your thumb pointing towards the ceiling (where possible). When your thumb falls to the side it’s less stable for your finger position at the front and will lessen how much of a stretch you can get at the front with your fingers. You’ll end up gripping the guitar neck with the base of your palm & thumb. A lot of strain where you can avoid it. You will find even a C chord difficult if your thumb is dropped to the side. ! See picture 3 under static thumb section for best positioning.

3. The Static Thumb – Not taking your thumb with you when you move. Chords, riffs and scales are often in different positions and places on the neck. We always need to reorientate the thumb so it keeps the integrity of the shape at the front. I have seen people playing power chords up the neck while trying to leave their thumb in the original position. Remember to take your thumb with you.
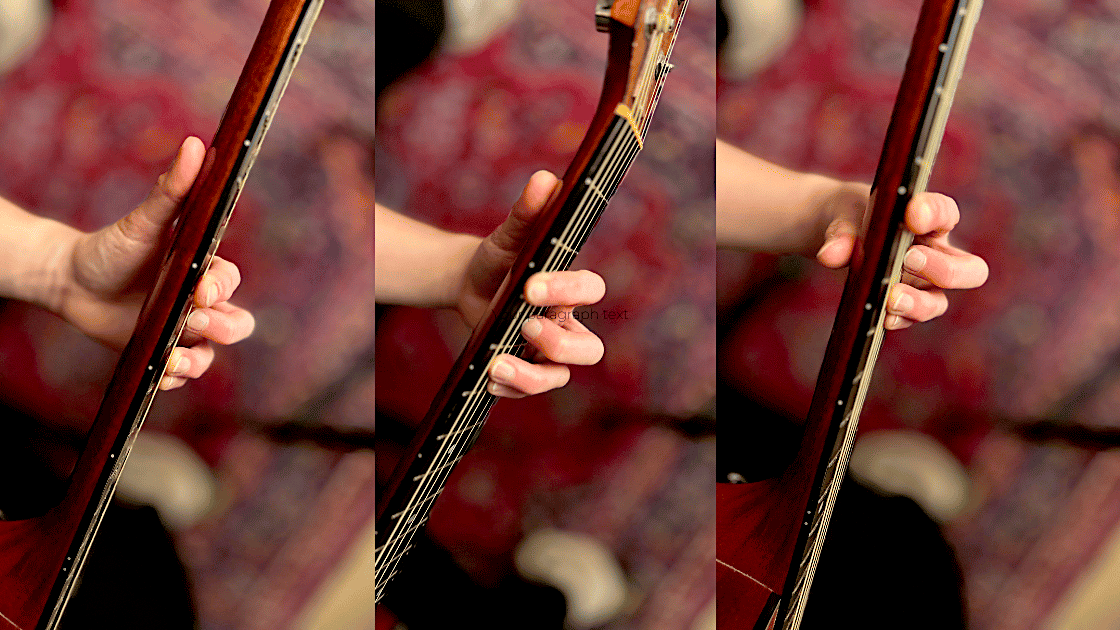
1&2) left behind 3) Thumb invited
4. High Thumb – You will see seasoned guitarists hanging their thumbs over the top of the fretboard. It can come in useful for muting the low E string, fretting the E & A Strings for certain chords. But If you’re playing a scale from low E (6), a chord that has a stretch like a C or barre chords etc it becomes a hindrance. So, when you’re starting out keep your thumb lower down. It will help you to build your chord foundations. A high thumb will often cause the fingers at the front to squash together or flatten in shape so they rest on other strings when you don’t want them to. Once you’ve nailed your foundations, start playing around with your thumb position.

1). Thumb mutes E string 2) Thumb low down to enable stretch 3) Thumb frets fret 2 E string for D/F# chord
5. Not using the Pinky – Finger independence is hugely important. We need to share the load and use different fingers to make our playing more efficient. It’s ok playing Crazy Train with one finger in the beginning but it will end up really slowing you down as you jump around needlessly. Unless you are not able to use your Pinky for a physical reason you should start training it now. The bonus of having an extra finger to use is big. Your pinky will feel like you have no control over it in the beginning and feel easier to not use it but the more you incorporate it when relevant (eg Dsus4 Hammer-on) it will start to feel normal.

1) Pinky plays fret 3 e string for Gadd11 2) Pinky used for Dsus4 chord
6. 123 fingers – Putting down fingers one at a time for each chord. This takes way longer to get into the chord and once you start playing chord sequences this will really slow you down. It’s ok right in the beginning as you learn your way around the shapes but then it’s time to move on. Once you have learned the chord shape the next step is to land it in one go. Even better when changing between chords shape shift in the air ready to land the next one. Practice moving in one shape shift in the air. This will bring much more fluency to your chord changes.
7. Out of Tune – Not learning to tune. Often newbies wait for someone else to tune their guitar or don’t understand it needs tuning. A priceless skill for a variety of reasons – the more you do it, the quicker you get at it, having an in-tune guitar really elevates your playing experience (what sounds better, feels better), your ears really start to recognise the nuances of different strings and this has a seriously positive knock on effect for ear training and recognising parts on songs. You don’t even need to pay for a tuner, there are a ton of free apps.
8. Leaning & Twisting – Leaning the guitar back to look at the strings. Yes, it makes sense right at the beginning but…It forces you to work harder to reach the strings, flattens your fingers out so they’re more likely to rest on other strings by accident, puts your wrist in an unnatural over-bent position. It puts your back into a twisted crane posture which is not good over time. We need to look after our backs and necks as guitarists. The best thing to do is look briefly and then put your guitar back facing forward and sit up properly. Do this periodically.
9. Avoiding String Changes – not learning to change your own strings is ok whilst you’re building your confidence as a new guitarist but once you’re playing a bit you should, as a right of passage, learn to change your own strings. Yes it can get overwhelming – what’s a gauge? Which brand? How much?? We’ve all messed up at some point but you get good at it quickly once you’ve broken a few strings putting them on wrong. Why wait for someone else to do it when it’s your guitar? Let’s get going. There are MANY videos on YT showing you this very thing. You can do it.
10. In case – Leaving your guitar in a case or out of the way at home. It’s not always possible to leave your guitar out of its case to avoid damage etc but at least keep your guitar accessible so you can pick it up easily. You’ll be amazed how much of a difference this makes. Even for 5 mins when you walk past it. I had a student who would leave it by his kettle so when he made a brew he’d play guitar. Make it easy for yourself to pick your guitar up and practice. I put mine on wall mounts as the picture to the right shows. Easy access.

11. Chairs – Sitting in a chair that promotes bad posture or awkward guitar holding eg on sofas or chairs with arms. It’s possible to sit on these chairs and play but you need to perch on the edge so your guitar is in a usable position. Try and find a chair that puts you in a comfortable position to reach your guitar. One that leaves your thighs at a good height so you can rest your guitar on them without it sliding off.
12. Reading, not listening – Using tab without listening to the song. Music is a sound. The best development for ear training and embedding the music you’re learning is to hear and match it. If you’re learning from Tab (a fantastic resource) a good practice is to listen to a recording of the song, riff etc you’re trying to learn and follow it through by reading tab as the recording plays so you can start to recognise what the tab you’re looking at sounds like or what the section you’re listening to looks like. This gets easier the more you do it. The more ways you can identify sections in a song by listening, the better guitarist you will become.
13. Centre Position– Putting fingers in the middle or back of the fret. The most effective place on a fret you can put your fingers is right next to the wire, not on it but right behind it. The fret is where the string cuts off to create the note so the closer to that you are the less likely you are to get excess movement in the string that creates buzz. This is especially important info on the first fret, the nut creates extra tension on the string and you have to work harder to press that down. There are some situations you can’t avoid being a little further back eg A chord but where possible get as close as possible. It will lessen the chances of fret buzz, increase the chance of a clean note, you won’t have to put as much pressure on the string either and your fingers will thank you for that when you’re 30 mins into a practise session.
-

- 1) too far back 2)ideal 3)ideal
-
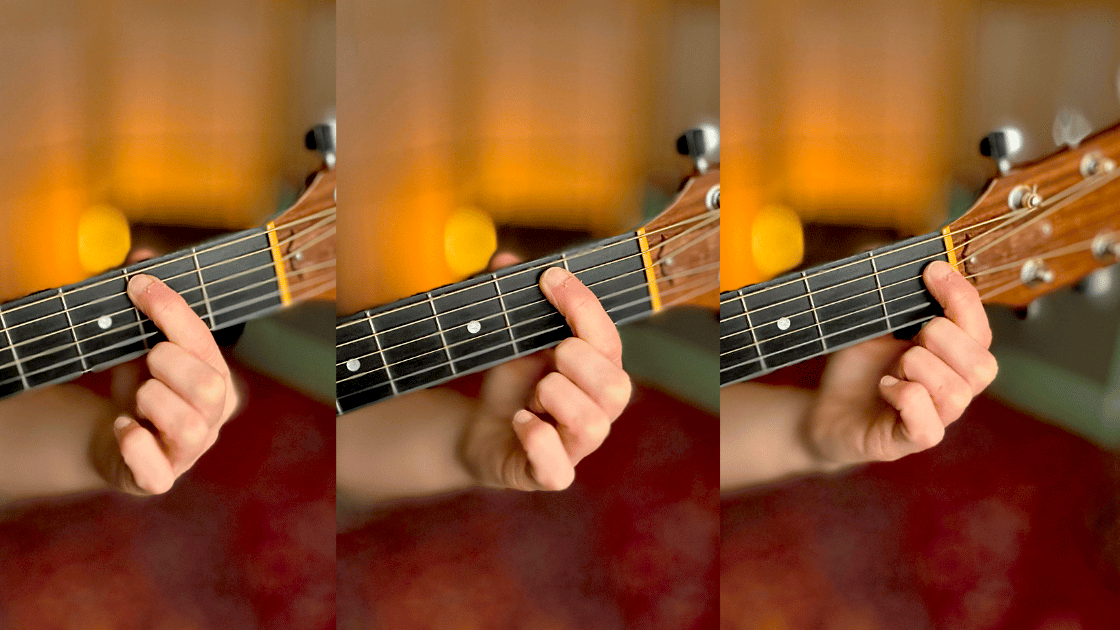
- 1)ideal 2&3) too far back
14. Lack of practise – I see often that students don’t practise between guitar lessons. Effectively we start from scratch each time. Progress is made with regular practice. Reps. Practise – have a break, sleep on it, process it all and then practise again. Work, rest, repeat. You will see progress. If you do this for 6 months with a consistent routine you’ll be very happy with your new guitar prowess. If you don’t practise don’t be upset that you still can’t get that change from C to G chords.
15. Speed obsession – focus on accuracy and foundations rather than speed. Forget about speeding through 7 Nation Army if you can’t get a clean sound out of your power chords and change position without slipping the shape. If your power chords are mint & you can jump from 7th to 10th fret and still have a power chord then go for the speed.
Are you doing any of these things? what other tweaks have you discovered about playing your guitar that were a real game changer for your playing? Is there anything above that you do that doesn’t cause you any real problem?
➡️ WATCH RELATED VIDEO
0 Comments